Saturday, May 11, 2013

Altered Shadow Box Canvas

2 comments
I always love finding creative, fun ways to display pictures. I have a gazillion photos on my computer. My kids are so dang cute I can't help myself and I just love taking pictures. So it has been my goal to get those pictures off the computer and seen - whether in albums or on the wall. I also love, love, love how some artists mix photos with altered canvases. So, I thought it would be super fun to turn a standard canvas around and use the back like a shadow box. I thought if I wrapped twine around the top, it would be perfect to hang a picture with tiny clothespins.


I wanted to have a very shabby, neutral, soft look to the finished frame. So I used lots of white, cream, browns, and light aqua. The first thing I did was cover the outer edge with brown scrapbook paper using Mod Podge. Once that was dry, I painted it with the various shades I mentioned and did some stamping too. I set the canvas aside to dry and worked on the little piece above. I tore a piece of scrapbook paper to the size I need, inked the edges with Distress Stain in Walnut, and added some paint with my good ol' fingers. I added some stamping and paint to the chipboard letters as well. These were from a Tim Holtz collection of chipboard letters I had found on clearance. Yippee for red clearance stickers! :)


Then on the inside I used a waterproof black pen and wrote some words. You could write a poem, a sweet love note, or a favorite quote...anything really. It really is for visual texture and sentiment. I painted over the words with white acrylic and gesso. Not all the words are completely visible, but that creates such pretty texture. I added stamps too.


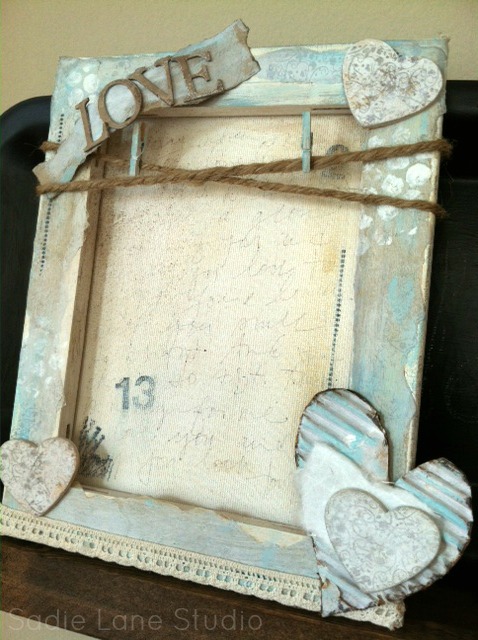
For the hearts I used some small wooden ones I had in my stash. I stamped them with a patterned stamp in Walnut, then painted over them with gesso. For the larger heart on the bottom right corner, I attached one of the wooden heart to a larger one that had been cut from an old box. Gotta love using recycled stuff, right!? Before gluing the pieces together, I added a small piece of cream colored fiber paper to the back.


Now it was time to glue it all together. I took all the pieces and used E6000 to secure all the various parts. I painted some mini clothespins (adorable!) with aqua acrylic paint and tied some thick twine around the canvas. I used some adhesive cream lace along the bottom. I find these at Michaels on rolls. I love that all I have to do is peel and stick!

 
Now all I had to do was add a cute picture. Adorable!!


I had a great time making this altered, shadow box canvas and I can't wait to make another one! I hope you are having a beautiful weekend!

Happy Creating,

Friday, May 3, 2013

me & my BIG ideas Pocket Card Canvas

0 comments


I love the me & my BIG ideas Pocket Pages cards. Have you seen them? I have been spotting them everywhere on Instagram and they have been making their way into my cart when I go to Michaels. They are super affordable ($4.99 for 72 cards plus my 40% off coupon - score!) and perfect for Project Life. I have gathered quite a few different packages to use on my album and my daughter's (Yep! She is making her own mini album). I am seriously in love. 

With summer looming around the corner, I really wanted to add a splash of color to our mantle in the family room. This room is in the back of the house and can get pretty dark. It doesn't get the best light, but in the heat of the summer the lack of direct sun keeps it cool. I however, love the front of the house that gets a lot more light. Which leads me to the need to bring some sunny into the family room. Easy, quick solution - use a bright, cheerful mambi card. So I thought using one of the yellow 4x6 (they also have 3x4 in the package) in a mixed media canvas would be perfect. The best part is that I used the packaging that the cards came in for the back! Let me show you how you can make one too!!

 Here are the supplies I used :
  • One 4x6 card from me & my BIG ideas POCKET PAGES Themed Cards (Michaels)
  • POCKET PAGES packaging (Woot! Better than the recycle bin!)
  • various washi tapes in yellow 
  • book pages
  • tape runner adhesive
  • Tim Holtz Distress Ink in Frayed Burlap
  • Staz On - Jet Black
  • Small butterfly stamp
  • Paper flowers from stash
  • Various trims in aqua
  • White Unibal Signo
  • Enamel Dots from My Mind's Eye (The Sweetest Thing collection)
***Not pictured : Americana acrylic craft paint, Liquitex gesso, and Mod Podge
Also, the pocket pages come in several different themed packages. I have several different ones and I am not sure which one this card came from. But, the package shows all the various cards on the back. How nice is that!?


First, use the back of the packaging and glue book pages to the surface with Mod Podge. Remember to use the glue under and over. Apply a good amount to the surface, then the back of the paper. Once it is down use an old credit or gift card to press out any air bubbles. Repeat this process until the entire paper is covered.


After it dries add a layer of gesso. Let that dry too. Then use paint and create a fun background. I like to use credit cards, a brayer, and my fingers to create variety and texture in the background. I added the yellows for a pop of color and tie the card into the background.


Add more layers with stamps and pen. I adore my white Unibal Signo. It writes like a dream and I love adding words or marks to the background. I use this tiny butterfly stamp all the time. It is so cute.

I know most of the center portion of this will be unseen under the card. So I didn't worry much about it. I did feel that the edges around the outside needed a little distressing. So I pulled out my Frayed Burlap and used it all around the outside. I was going to distress the edge of the card too, but changed my mind. 


While I let the back piece dry, I added some washi tape to the actual mambi card to jazz it up a bit. Who doesn't love a bit of washi tape, right? :)


Next, I used an adhesive tape runner and attached the card to the canvas. I wanted to tie the blue in the background with the card (which is very yellow) so I spotted some aqua trim I had picked up awhile ago from the $2 bin at Michaels (really. I don't go there that much. No, really. Ha!) I tied it around the entire canvas. It was just the right amount of blue. :) I hot glued three paper flowers from my stash onto the corners. Then popped in a My Mind's Eye enamel dot in each center. I was going to use a button, but the enamel dots looked so awesome.

That's it! How fun was that!? There are so many different cards in these packs, so there is so much that you can do with them. I already have ideas for more, so I will be sure to share them!! All I know is that my mantle will now have a perfect amount of sunshine to welcome in summer.


I hope you have a beautiful sunshine-filled weekend!
Happy Creating,